Key Takeaways
- Quantum Fiber (the 2023 rebrand of CenturyLink Fiber) offers native dual-stack IPv6 on every fiber plan, so the underlying network is unchanged.
- You'll learn the full step-by-step process for enabling IPv6 on the C4000-series router via Advanced Setup, WAN Settings and LAN IPv6 configuration.
- The guide covers quick IPv6 setup on third-party ASUS, TP-Link and NETGEAR routers, plus which provided modems (C4000XG, C3000Z, C1100Z) support it.
- We show how to confirm IPv6 is live using test-ipv6.com, the router status page and command-line checks on Windows, Mac and Linux.
- You'll get fixes for common problems including no connection, intermittent IPv6 and slow speeds, covering DHCPv6-PD versus Stateless, firmware and MTU 1492.
Quick Answer: Does Quantum Fiber Support IPv6?
Yes! Quantum Fiber (formerly CenturyLink Fiber) fully supports native IPv6 with dual-stack configuration on all fiber plans. To enable IPv6:
- Log into your router at 192.168.0.1
- Navigate to Advanced Setup → WAN Settings
- Enable IPv6 and select DHCPv6-PD or Stateless
- Apply settings and reboot
Most modern routers will auto-configure IPv6, but older CenturyLink modems may require manual setup. If you're experiencing issues or have an outdated router, we recommend upgrading to a modern WiFi 6 router with full IPv6 support.
What is Quantum Fiber? (CenturyLink Rebrand 2023)
In 2023, CenturyLink rebranded its fiber internet service to Quantum Fiber. If you're a CenturyLink customer, you're now technically a Quantum Fiber customer—nothing has changed except the name. All the technical details, customer support, and network infrastructure remain the same.
Key Points:
- Same fiber network infrastructure
- Same login credentials for router
- Same IPv6 support (native dual-stack)
- Better branding, same great service
- Available in 16+ states across the US
If you're having general internet issues with Quantum Fiber, check out our comprehensive troubleshooting guide.
Why IPv6 Matters in 2025
IPv6 (Internet Protocol version 6) is becoming increasingly important as the internet continues to grow. Here's why you should care:
Benefits of IPv6
More IP Addresses IPv6 provides 340 undecillion addresses (that's 340 trillion trillion trillion!), solving the IPv4 address exhaustion problem permanently.
Better Performance
- Reduced latency for online gaming
- Faster peer-to-peer connections
- Improved streaming quality
- Better smart home device connectivity
Enhanced Security
- IPsec (Internet Protocol Security) built-in
- Better end-to-end encryption
- Improved authentication protocols
Future-Proof Major services like Google, Facebook, Netflix, and YouTube prioritize IPv6 traffic. By 2025, many new services and devices require IPv6 to function optimally.
IPv6 vs IPv4: What's the Difference?
| Feature | IPv4 | IPv6 |
|---|---|---|
| Address Length | 32-bit (4.3 billion addresses) | 128-bit (340 undecillion addresses) |
| Address Format | 192.168.1.1 | 2001:0db8:85a3::8a2e:0370:7334 |
| Security | Optional (IPsec) | Built-in (IPsec) |
| Performance | Slower routing | Faster routing |
| NAT Required | Yes (usually) | No |
| Future | Being phased out | The future |
Prerequisites: What You Need
Before enabling IPv6 on Quantum Fiber, ensure you have:
1. Active Quantum Fiber Service
- Any fiber speed tier (200 Mbps to 940 Mbps)
- IPv6 is available on all fiber plans
- Check availability in your area at quantumfiber.com
2. Compatible Router
Your router must support IPv6. Check if your router has:
- IPv6 DHCPv6-PD support
- Dual-stack capability (IPv4 + IPv6)
- Firmware updated within the last 2 years
Quantum Fiber Provided Routers:
- C4000XG (WiFi 6) - ✅ Full IPv6 support
- C4000LZ/C4000BG - ✅ IPv6 supported
- C3000Z - ⚠️ Limited IPv6 support (consider upgrading)
- C1100Z - ❌ Outdated, upgrade recommended
3. Router Admin Access
You'll need:
- Router admin username (usually "admin")
- Router admin password (check bottom of router or your account)
- Computer or phone connected to your network
Best Routers for Quantum Fiber with IPv6 (2025)
If you're using an old Quantum Fiber modem or want better performance, consider upgrading to a modern router with full IPv6 support. Here are our top recommendations:
Budget Option: TP-Link Archer AX21 WiFi 6 Router
Perfect for most homes and apartments
Key Features:
- WiFi 6 (802.11ax) technology
- Full IPv6 support with DHCPv6-PD
- Dual-band speeds up to 1.8 Gbps
- OFDMA for efficient device management
- Easy IPv6 setup wizard
Best For: 1-2 bedroom homes, basic streaming and browsing, budget-conscious users
Price Range: $70-90
Check Current Price on Amazon →
Mid-Range: ASUS RT-AX86U WiFi 6 Gaming Router
Our top recommendation for most Quantum Fiber customers
Key Features:
- Advanced IPv6 features (dual-stack, IPv6 firewall)
- WiFi 6 with 5700 Mbps combined speeds
- 2.5G WAN port (future-proof for multi-gig plans)
- Gaming acceleration and QoS
- AiMesh support for whole-home coverage
- Lifetime free AiProtection Pro security
Best For: 3-4 bedroom homes, gamers, 4K streaming, smart home devices
Price Range: $200-250
Check Current Price on Amazon →
Premium: ASUS RT-AXE7800 Tri-Band WiFi 6E Router
For power users who demand the absolute best
Key Features:
- WiFi 6E with exclusive 6 GHz band
- Advanced IPv6 configuration options
- 7800 Mbps combined speeds
- Tri-band technology reduces congestion
- Multiple 2.5G/10G ports available
- Enterprise-level security features
Best For: Large homes, tech enthusiasts, multiple 4K/8K streams, VR gaming
Price Range: $300-400
Check Current Price on Amazon →
Comparison: Which Router is Right for You?
| Router | Speed | Best For | IPv6 Features | Price |
|---|---|---|---|---|
| TP-Link AX21 | 1.8 Gbps | Budget/Small homes | Basic | $70-90 |
| ASUS RT-AX86U | 5.7 Gbps | Most users/Gamers | Advanced | $200-250 |
| ASUS RT-AXE7800 | 7.8 Gbps | Power users | Enterprise | $300-400 |
Our Recommendation: For 90% of Quantum Fiber customers, the ASUS RT-AX86U offers the best balance of performance, features, and value.
Step-by-Step: Enable IPv6 on Quantum Fiber Router
Method 1: Using Quantum Fiber C4000 Series Router
If you're using the router provided by Quantum Fiber, follow these steps:
Step 1: Connect to Your Network
Use WiFi or an Ethernet cable to connect your computer or device to your Quantum Fiber network. For best results during setup, we recommend using an Ethernet connection.
Recommended: Use a quality Cat 6 or Cat 8 Ethernet cable for stable configuration:
Amazon Basics Cat 6 Ethernet Cable - 10 ft →
Step 2: Access Router Admin Panel
- Open your web browser (Chrome, Firefox, Safari, or Edge)
- Type http://192.168.0.1 in the address bar
- Press Enter

Can't Access? Try these alternative IP addresses:
- 192.168.1.1
- 192.168.0.254
- 192.168.1.254
Step 3: Log In with Admin Credentials
Enter your admin username and password. These are different from your WiFi network name and password.
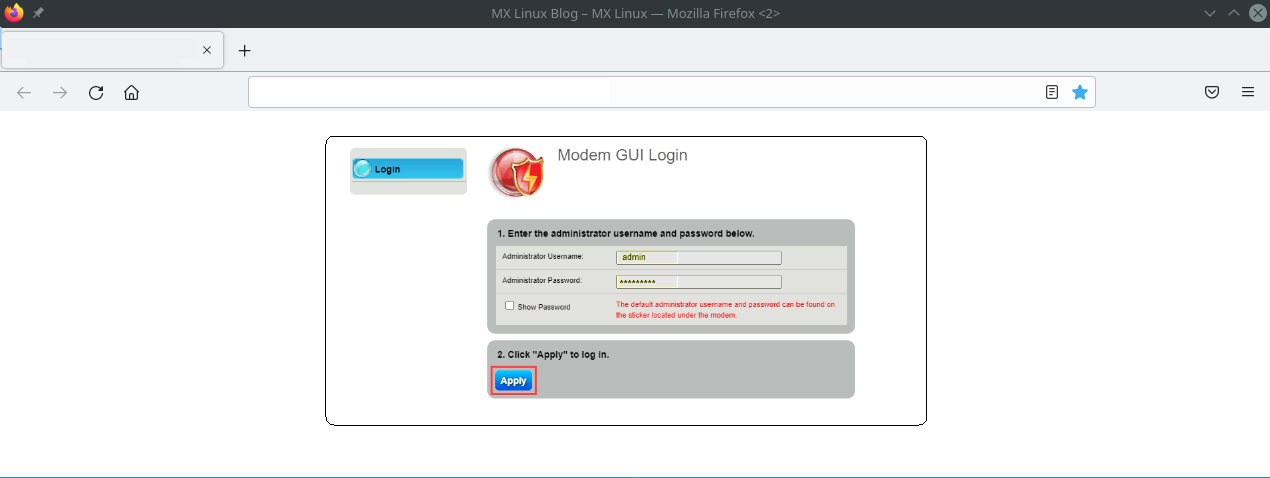
Default Credentials:
- Username: admin
- Password: Check the sticker on the bottom/back of your router
Forgot Your Password? If you changed your admin password and forgot it, you'll need to factory reset your router (hold reset button for 10 seconds). Make sure to save your WiFi settings first!
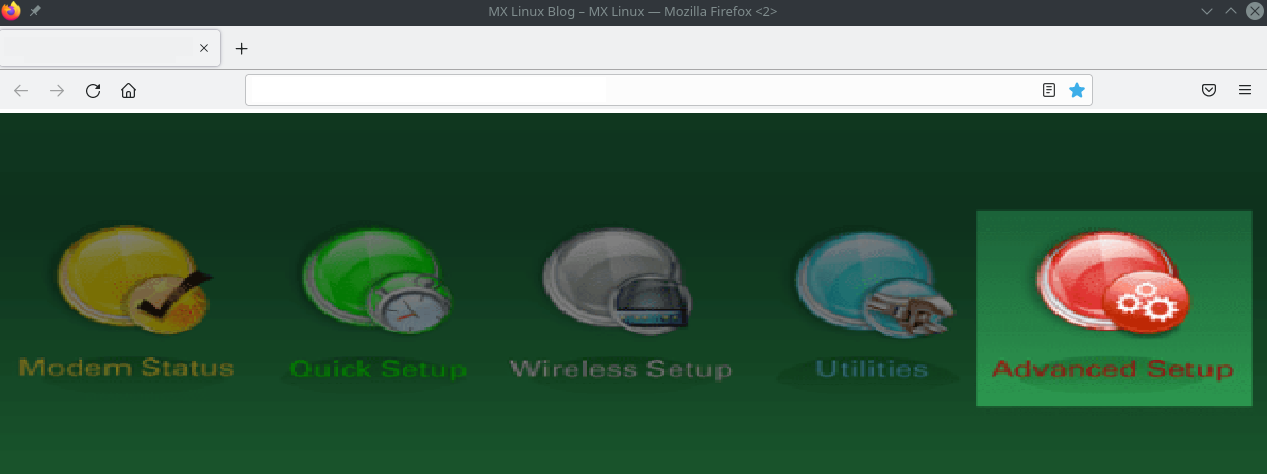
Step 4: Navigate to Advanced Setup
From the main menu, click on "Advanced Setup" in the left sidebar.
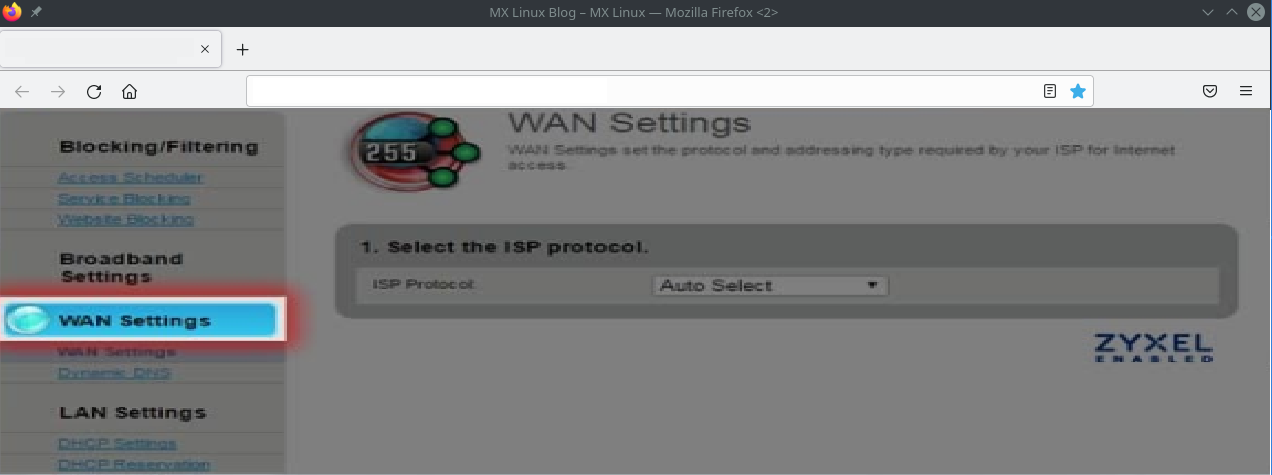
Step 5: Configure WAN Settings
- Click "WAN Settings" in the left sidebar
- Select your ISP Protocol from the dropdown
- Most users should select "Auto-Select" or "DHCPv6-PD"
Step 6: Enable IPv6
- Scroll down to the IPv6 section
- Click the "Enable" checkbox next to IPv6
- Select IPv6 Addressing Type: Choose "Stateless" or "DHCPv6-PD"
- Stateless (SLAAC): Simpler, works for most users
- DHCPv6-PD: More control, recommended for advanced users
Step 7: Apply Settings
Click "Apply" at the bottom of the page to save your changes.
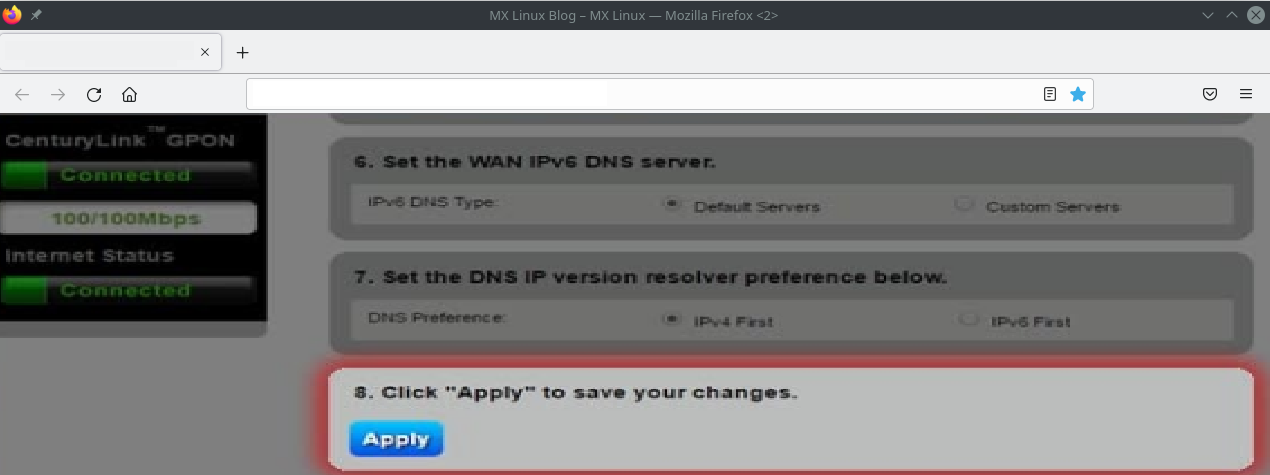
Your router may reboot automatically. If not, you may want to manually reboot it for the changes to take effect.
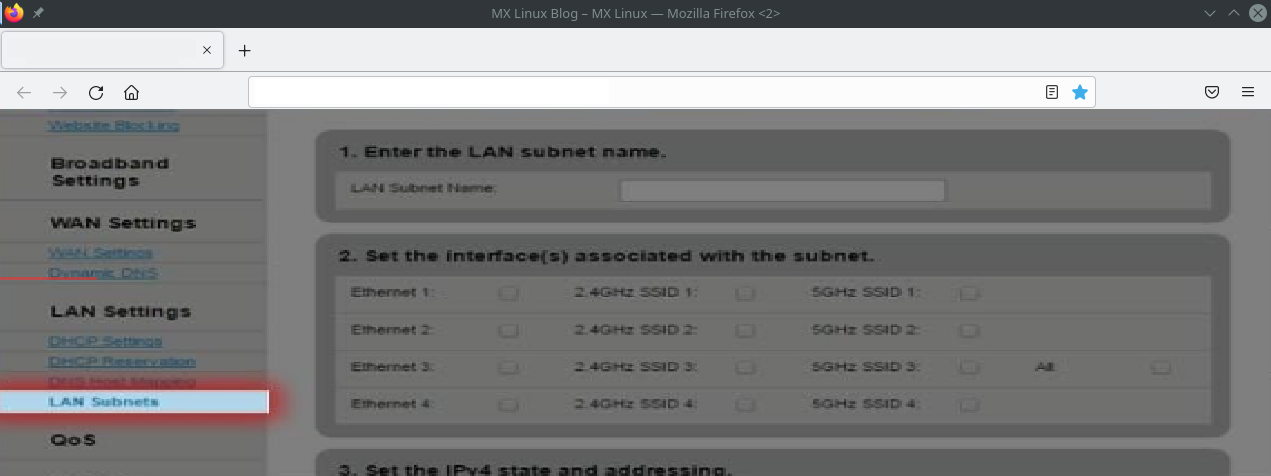
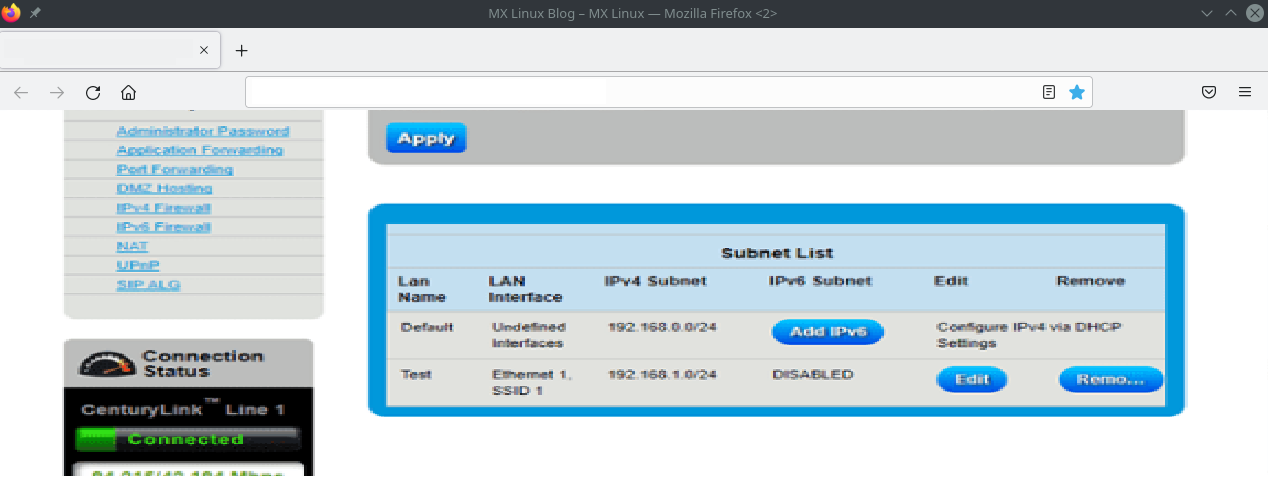
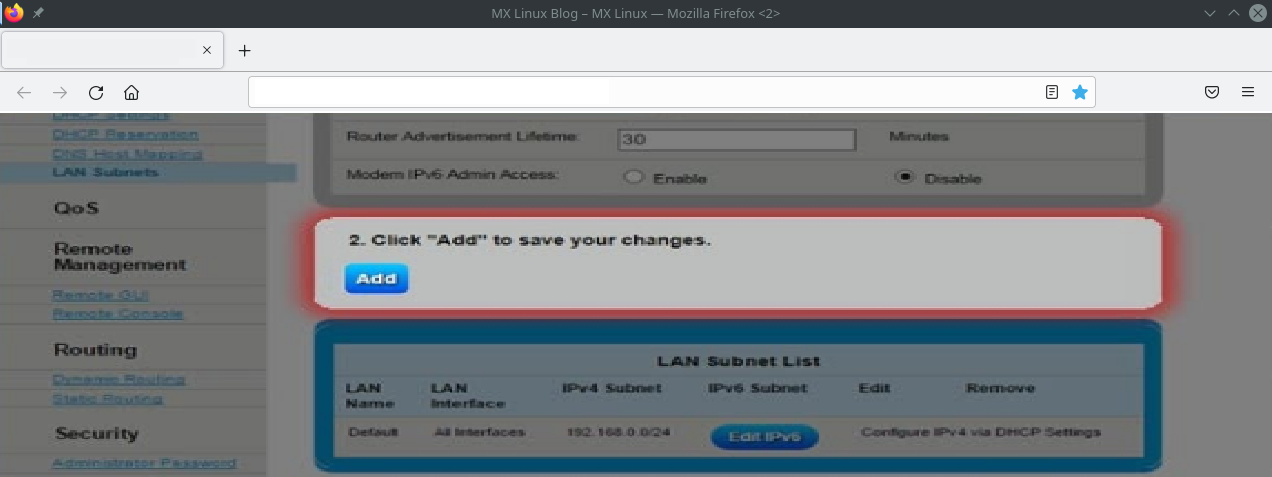
Step 8: Configure LAN IPv6 Settings
- Navigate to "LAN Settings" → "LAN Subnets"
- Click "Add IPv6" or "Edit IPv6" (varies by model)
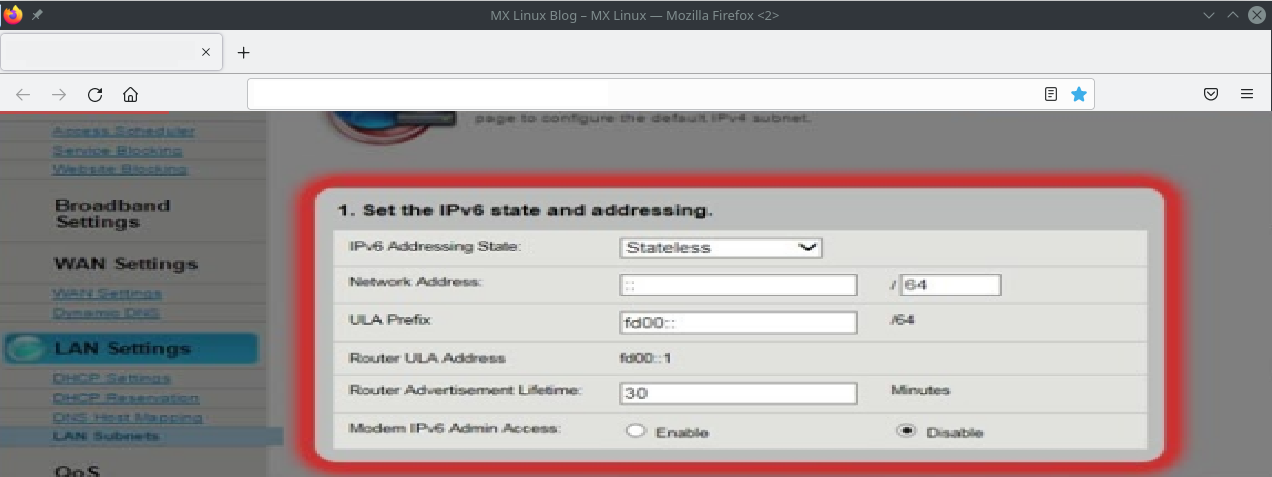
Step 9: Set IPv6 Addressing State
- Choose "Stateless" as the IPv6 Addressing State
- The IPv6 address should populate automatically from your WAN settings
- If it doesn't appear, check Modem Status menu for your IPv6 address
Step 10: Save Your Changes
Click "Add" or "Apply" to finalize your IPv6 LAN configuration.
Congratulations! Your Quantum Fiber connection now supports IPv6. Proceed to the verification section below to confirm everything is working properly.
Method 2: Using Third-Party Router (ASUS, TP-Link, NETGEAR)
If you're using your own router with Quantum Fiber, the setup process is usually simpler. Here's how:
For ASUS Routers (RT-AX86U, RT-AXE7800, etc.)
- Log into router at 192.168.1.1 (or router.asus.com)
- Navigate to Advanced Settings → WAN
- Scroll to IPv6 section
- Set Connection Type: Native with DHCP-PD
- Enable IPv6 DNS and optionally enable IPv6 Firewall
- Click Apply
ASUS routers auto-configure IPv6 in most cases - super easy!
For TP-Link Routers (Archer AX21, etc.)
- Log into router at 192.168.0.1 or tplinkwifi.net
- Go to Advanced → Network → Internet
- Scroll to IPv6 section
- Enable IPv6
- Select Internet Connection Type: DHCPv6
- Click Save
For NETGEAR Routers
- Log into router at 192.168.1.1 or routerlogin.net
- Navigate to Advanced → Advanced Setup → IPv6
- Enable IPv6
- Select Internet Connection Type: Auto Detect
- Click Apply
How to Verify IPv6 is Working
After enabling IPv6, it's important to verify that everything is working correctly. Here are several methods:
Method 1: Online IPv6 Test (Easiest)
Visit one of these websites from a device connected to your Quantum Fiber network:
Option 1: Test-IPv6.com
- Go to https://test-ipv6.com
- Wait for the test to complete (10-15 seconds)
- Look for results:
- ✅ 10/10 Score: Perfect IPv6 connectivity
- ⚠️ 7-9/10: IPv6 working but with some issues
- ❌ Below 7: IPv6 not properly configured
Option 2: IPv6-Test.com
- Visit https://ipv6-test.com
- Check for your IPv6 address display
- Should show both IPv4 and IPv6 addresses (dual-stack)
Method 2: Router Status Page
- Log back into your router (192.168.0.1)
- Navigate to Status or Modem Status
- Look for WAN IPv6 Address field
- Should display something like:
2001:0db8:85a3::8a2e:0370:7334
Method 3: Command Line Verification
For Windows:
- Press Windows Key + R
- Type cmd and press Enter
- Type:
ipconfig - Look for IPv6 Address under your network adapter
- Should start with
2001:or2600:
For Mac:
- Open Terminal (Applications → Utilities)
- Type:
ifconfig - Look for inet6 address
- Should see an address starting with
2001:or2600:
For Linux:
- Open Terminal
- Type:
ip -6 addr show - Check for global IPv6 addresses
Troubleshooting Common IPv6 Issues
Issue 1: IPv6 Not Connecting After Setup
Symptoms:
- IPv6 test shows 0/10 or no IPv6 address
- Router shows "No IPv6 address assigned"
Solutions:
A) Reboot Everything (Simple Fix)
- Power off your modem/router
- Wait 30 seconds
- Power back on
- Wait 2-3 minutes for full initialization
- Retest IPv6 connectivity
B) Check WAN Connection Type
- Ensure you selected DHCPv6-PD or Stateless
- Try switching between the two if one doesn't work
C) Contact Quantum Fiber Support IPv6 may not be provisioned in your area yet. Call support to verify:
- Phone: 1-888-386-9617
- Ask: "Is IPv6 available at my service address?"
Issue 2: IPv6 Works Intermittently
Symptoms:
- IPv6 works, then stops working randomly
- Some devices get IPv6, others don't
Solutions:
A) Update Router Firmware Old firmware can cause IPv6 instability:
- Check manufacturer's website for latest firmware
- Download and install update
- Reboot router after update
B) Disable IPv6 Privacy Extensions Some devices use privacy extensions that conflict:
- On Windows: Open Command Prompt (Admin)
- Type:
netsh interface ipv6 set privacy state=disabled - Restart computer
C) Check DHCP Lease Time
- Set IPv6 DHCP lease time to 86400 seconds (24 hours)
- This prevents frequent IPv6 address changes
Issue 3: Slow Speeds on IPv6
Symptoms:
- IPv4 speed tests are normal
- IPv6 speed tests show slower speeds
Solutions:
A) Test Using IPv6-Only Speed Test Use https://speedtest6.he.net to measure pure IPv6 performance
B) Check MTU Settings
- In router, navigate to WAN settings
- Set MTU to 1492 for optimal performance
- Apply and reboot
C) Consider Upgrading Router Older routers struggle with IPv6 performance. Modern WiFi 6 routers handle IPv6 much better:
View ASUS RT-AX86U on Amazon →
Comparison: IPv6 Support Across Major ISPs (2025)
Wondering how Quantum Fiber compares to other internet providers?
| ISP | IPv6 Support | Dual-Stack | Native IPv6 | Auto-Config |
|---|---|---|---|---|
| Quantum Fiber | ✅ Full | ✅ Yes | ✅ Yes | ✅ Yes |
| Xfinity/Comcast | ✅ Full | ✅ Yes | ✅ Yes | ✅ Yes |
| AT&T Fiber | ✅ Full | ✅ Yes | ✅ Yes | ⚠️ Sometimes |
| Verizon Fios | ✅ Full | ✅ Yes | ✅ Yes | ✅ Yes |
| Spectrum | ⚠️ Limited | ⚠️ Partial | ❌ No | ❌ No |
| Virgin Media (UK) | ❌ None | ❌ No | ❌ No | ❌ No |
| Cox | ⚠️ Limited | ⚠️ Partial | ❌ No | ❌ No |
| Google Fiber | ✅ Full | ✅ Yes | ✅ Yes | ✅ Yes |
Good news: Quantum Fiber is among the best ISPs for IPv6 support! If you're on Virgin Media and need IPv6, read our article: Does Virgin Media Support IPv6?
Frequently Asked Questions
Q: Is IPv6 automatically enabled on Quantum Fiber?
A: It depends on your router model. Newer C4000XG routers may have IPv6 enabled by default, but most older models require manual configuration. Follow the steps in this guide to enable it.
Q: Will enabling IPv6 slow down my internet?
A: No! IPv6 typically offers equal or better performance than IPv4. In many cases, IPv6 can reduce latency and improve speeds for services that support it (like YouTube, Netflix, and Facebook).
Q: Do I need a special router for IPv6?
A: Most routers made after 2015 support IPv6. If you have an older router, consider upgrading to a modern WiFi 6 router like the ASUS RT-AX86U or TP-Link Archer AX21 for better IPv6 performance.
Q: Can I use IPv6 and IPv4 at the same time?
A: Yes! This is called dual-stack operation and is the recommended configuration. Your devices will use IPv6 when available and fall back to IPv4 when needed. Quantum Fiber fully supports dual-stack.
Q: Does IPv6 improve gaming performance?
A: It can! IPv6 can reduce latency (ping) and eliminate NAT-related issues in peer-to-peer games. Many modern games and gaming services prefer IPv6 connections.
Q: Is IPv6 more secure than IPv4?
A: IPv6 has IPsec (Internet Protocol Security) built-in, which provides better encryption and authentication than IPv4. However, you should still use a firewall and keep your router firmware updated.
Q: Will all my devices work with IPv6?
A: Any device made in the last 10 years should support IPv6, including smartphones, tablets, computers, and smart home devices. Very old devices (pre-2010) may not support IPv6.
Q: What if IPv6 isn't available in my area?
A: Contact Quantum Fiber support at 1-888-386-9617 to check availability. IPv6 is available on all fiber plans in most service areas.
Q: How do I check if my device is using IPv6?
A: Visit https://test-ipv6.com from the device. If you see an IPv6 address and get a score of 10/10, your device is successfully using IPv6.
Q: Do I need to change DNS servers for IPv6?
A: Usually not necessary. Your router will automatically provide IPv6 DNS servers from Quantum Fiber. However, you can manually set IPv6 DNS if needed:
- Google IPv6 DNS: 2001:4860:4860::8888
- Cloudflare IPv6 DNS: 2606:4700:4700::1111
Conclusion: Get the Most from Your Quantum Fiber Connection
Enabling IPv6 on your Quantum Fiber internet connection is a smart move that future-proofs your network, improves performance, and enhances security. With native IPv6 support built into all Quantum Fiber plans, you're getting one of the best internet experiences available in 2025.
Key Takeaways:
- ✅ Quantum Fiber fully supports IPv6 on all fiber plans
- ✅ Setup takes less than 10 minutes with the right instructions
- ✅ Modern routers like the ASUS RT-AX86U make IPv6 configuration automatic
- ✅ IPv6 can improve gaming, streaming, and smart home performance
- ✅ Dual-stack operation (IPv4 + IPv6) is the recommended configuration
If you're still using an old Quantum Fiber modem, now is the perfect time to upgrade to a modern WiFi 6 router that handles IPv6 beautifully. Check out our router recommendations above for the best options.
Need Help?
- Quantum Fiber Support: 1-888-386-9617
- Test Your IPv6: https://test-ipv6.com
- Read More Guides: Browse our networking troubleshooting hub
Last updated: January 16, 2025. We regularly update this guide to ensure accuracy and include the latest router recommendations.